Adding an Email Signature in Outlook

An email signature is a great way to leave a lasting impression with every message you send. It provides recipients with essential information about you and your organization, such as your name, job title, company name, contact information, and even links to your social media profiles. This post will guide you through the steps to create and add an email signature in Microsoft Outlook.
Why Use an Email Signature?
- Professionalism: A well-designed signature enhances your professional appearance.
- Branding: It helps promote your brand by including your logo and company colors.
- Contact Information: Ensures that recipients have your contact details at their fingertips.
- Legal Compliance: In some regions, including disclaimers in your signature is a legal requirement.
How to Add an Email Signature in Outlook
For Outlook Desktop Application
- Open Outlook: Launch the Microsoft Outlook application on your computer.
- Access Signature Settings:
- Click on File in the top menu.
- Select Options from the sidebar.
- In the Outlook Options window, click on Mail and then click on Signatures.
- Create a New Signature:
- In the Signatures and Stationery window, click on the New button.
- Enter a name for your signature (e.g., “Work Signature”) and click OK.
- Design Your Signature:
- In the Edit signature box, create your signature. You can format text, add links, and insert images (like your company logo).
- Make use of formatting options such as font size, color, and style to make your signature visually appealing.
- Set Default Signatures:
- Under Choose default signature, you can select your new signature for new messages and replies/forwards.
- Save Your Signature:
- Click OK to save your changes, and then click OK again in the Options window to exit.
For Outlook on the Web
- Log into Outlook Web App: Open your web browser and log in to your Outlook account.
- Access Settings:
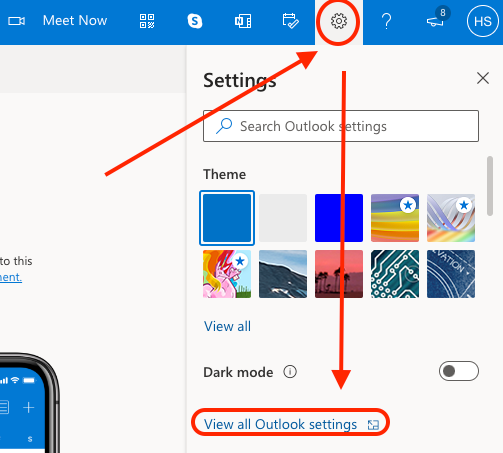
- Click on the Settings gear icon in the upper right corner.
- At the bottom of the menu, click on View all Outlook settings.
- Create Signature:
- In the settings menu, click on Mail and then select Compose and reply.
- In the Email signature box, create your signature using the formatting tools available.
- Set Signature Defaults:
- Below the signature box, choose whether to automatically include your signature on new messages and/or replies and forwards.
- Save Your Signature:
- Click Save at the bottom of the settings menu.
Example of an Email Signature
Here’s a simple example of what your email signature might look like:
makefileCopy codeBest regards,
John Doe
Marketing Manager
XYZ Company
Phone: (123) 456-7890
Email: john.doe@xyzcompany.com
Website: www.xyzcompany.com
LinkedIn: linkedin.com/in/johndoe
Tips for a Great Email Signature
- Keep it Simple: Avoid overcrowding your signature with too much information.
- Use Professional Fonts: Stick to professional fonts and colors that match your brand.
- Include Social Links: If applicable, add links to your social media profiles.
- Add Legal Disclaimers: If necessary, include legal disclaimers or confidentiality notices.
Conclusion
Adding an email signature in Outlook is a straightforward process that can enhance your professional communication. With just a few steps, you can create a signature that reflects your personal brand and provides recipients with important contact information. Remember to keep it professional and concise to make the best impression.
